Thank you for agreeing to write an article for Word by Word! We’re grateful for the opportunity to work with you. Below are a few simple instructions on how to send in your article, request payment, and so on. We know this can be a lot, so if you run into trouble, feel free to email your editor directly or contentmarketingteam@logos.com.
What to do at each step
- Step 1: Sign contract in LinkSquares
- Step 2: Accept invitation to Content Workflow (formerly GatherContent)
- Step 3: Review your content brief in Content Workflow
- Step 4: Add your article to Content Workflow and change status to Dev Edit
- Step 5: Complete your second draft and change status to Draft Complete
- Step 6: Once the article is published, send us the invoice for your completed article
- FAQs
Step 1: Sign contract in LinkSquares
Once we’ve agreed to your article’s topic and length, we’ll send you a contract via LinkSquares to your email address. You’ll need to sign it the same way you would send something sent via Docusign. If you can’t find your contract, check your spam filters and/or ask your editor to send it again.
Please note that the contract requires all content to be original, never-before-published work, and cannot be written by AI.
Step 2: Accept invitation to Content Workflow (formerly GatherContent)
Content Workflow helps us manage all the articles we publish in one place. It’s not perfect, but it’s better than losing a bunch of Google Docs.
Once your contract is signed, we’ll add you to Content Workflow, if you haven’t written for us before. You’ll receive an invitation via email to join Logos’s Content Workflow project, and from there we’ll assign you to your article with our previously agreed-upon due dates (usually the 1st or 15th of the month prior).
You’ll be working in the Word by Word 2024 project. Once you have an assignment, it will show in the top left corner.
Step 3: Review your content brief in Content Workflow
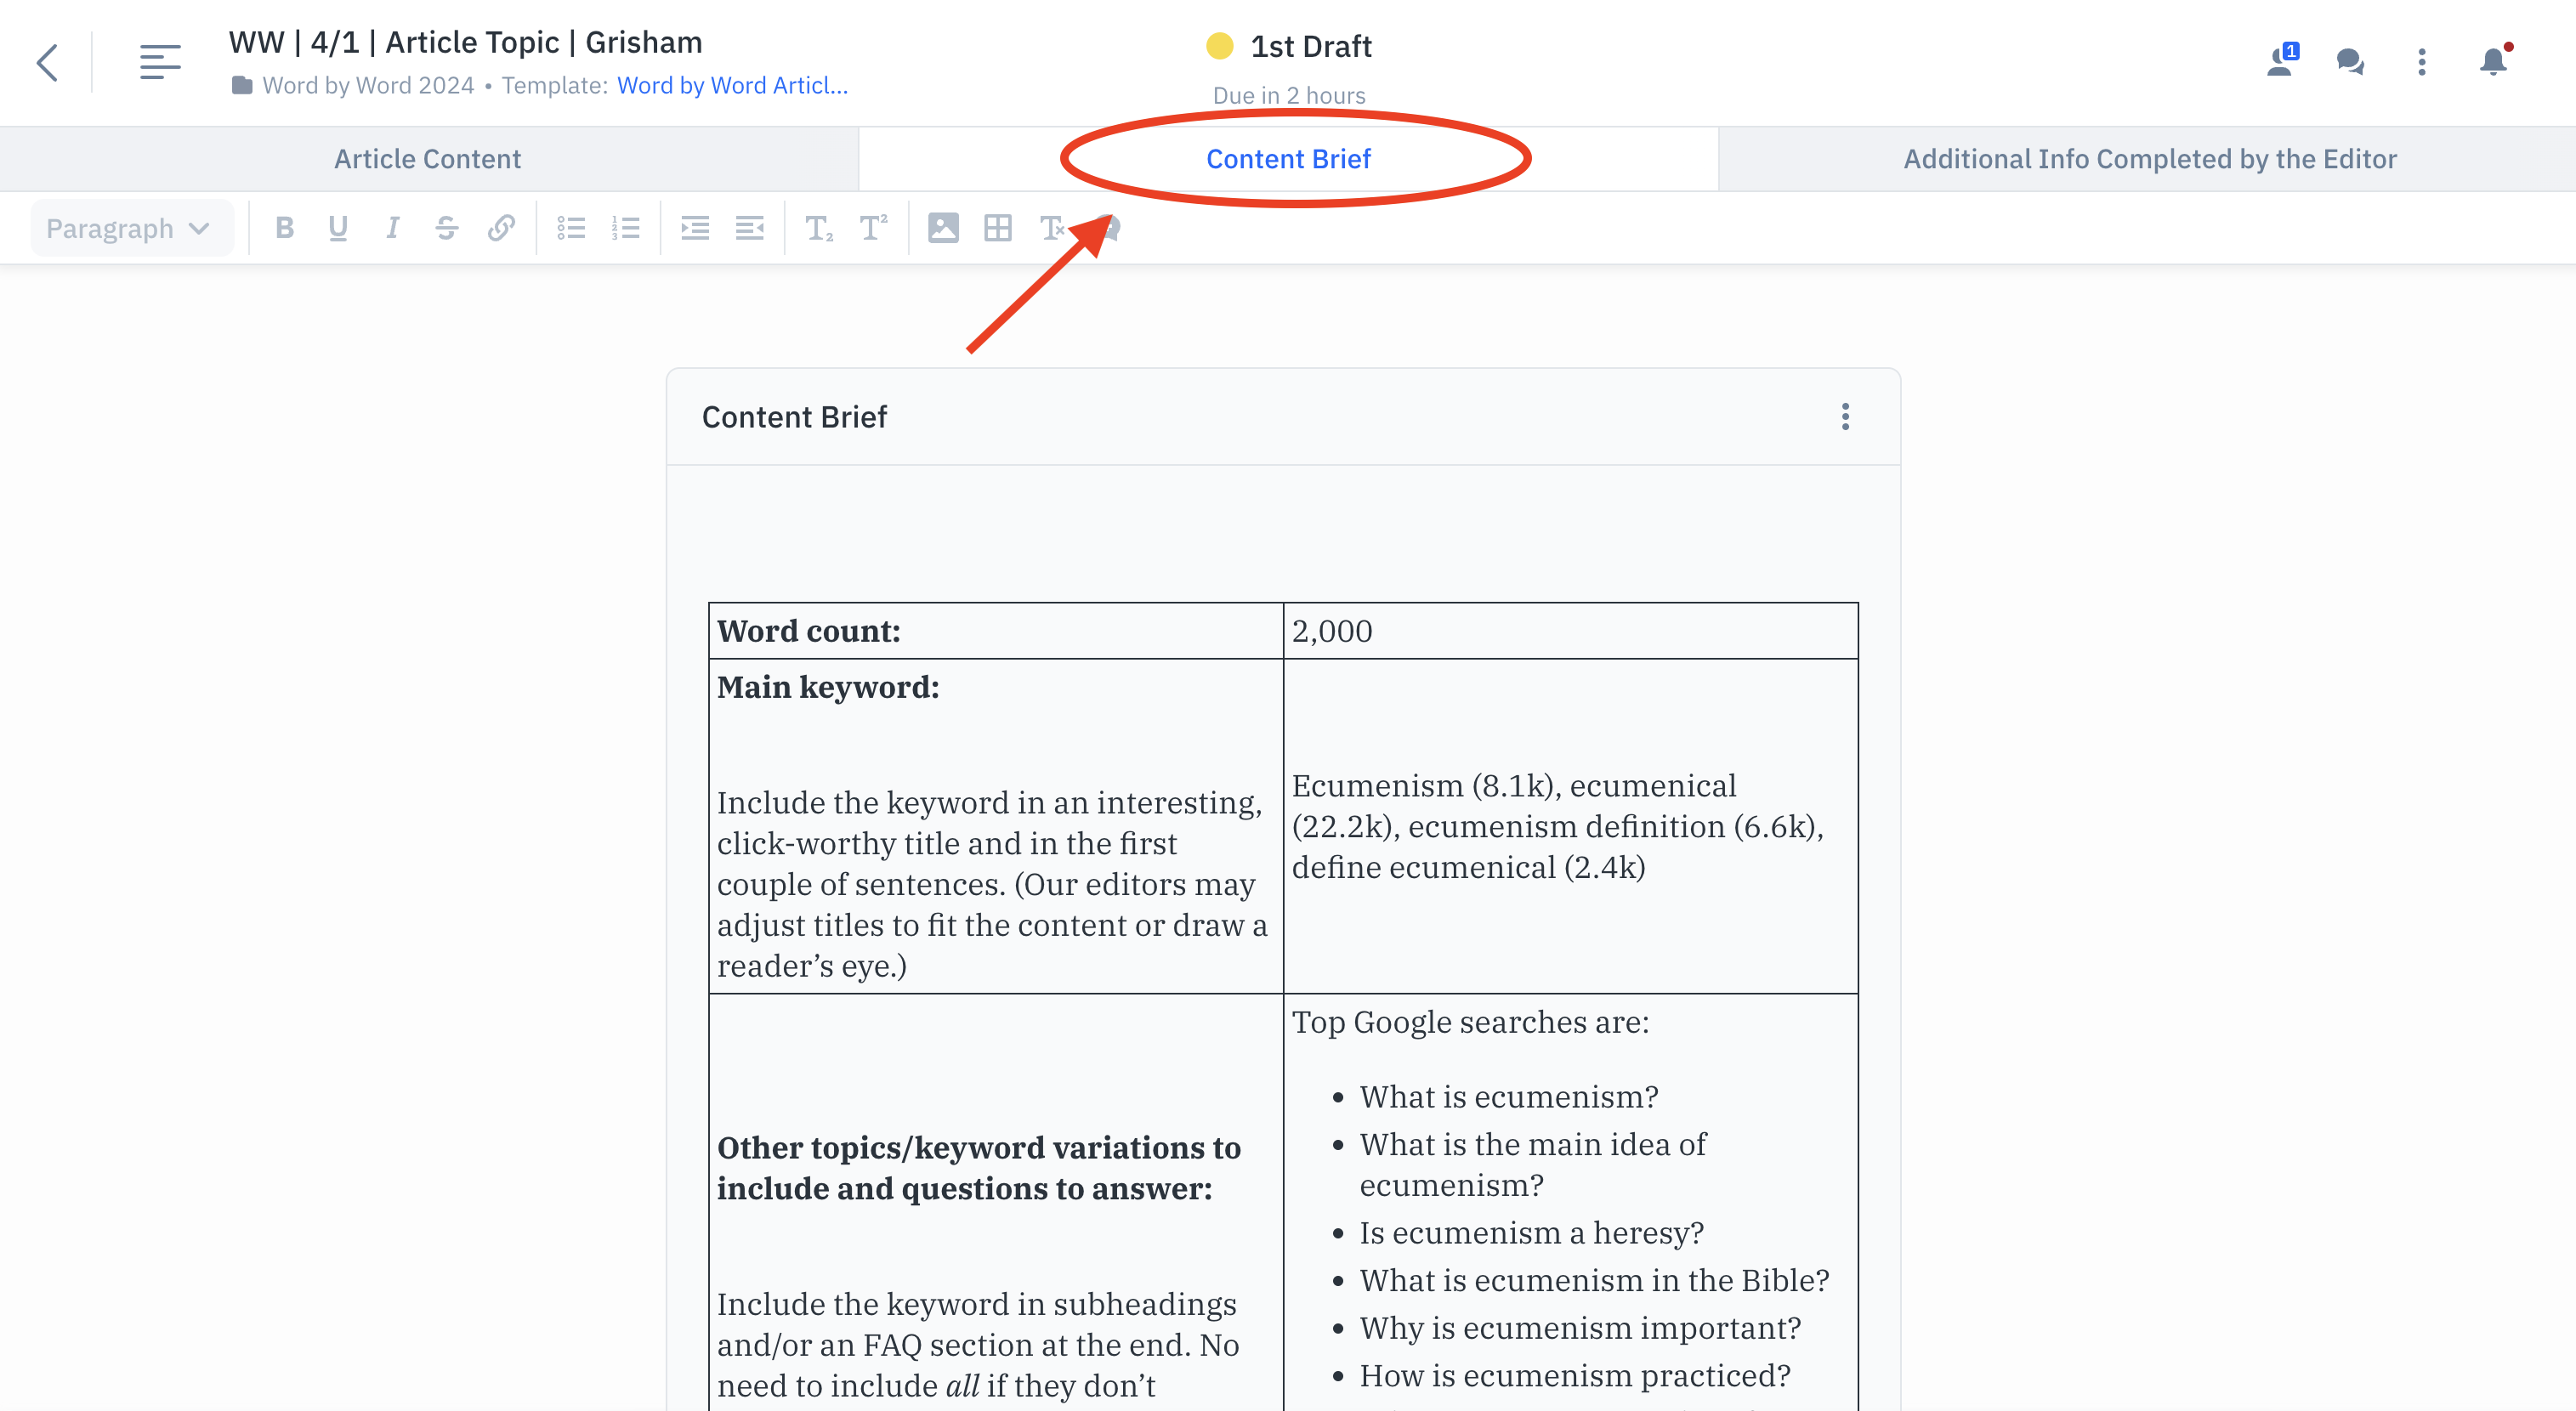
Not every article comes with a brief, but if yours does, your editor will let you know. Take a look at the brief in Content Workflow—it’s the middle tab on your article view.
The brief will have more information about your topic, the kinds of questions people are trying to find answers to, and related articles we’ve published, to name a few.
Please make sure you review the brief before you start writing. Sometimes we have to send articles back to writers because the first draft doesn’t match what we’re looking for. Don’t let it be you!

Step 4: Add your article to Content Workflow and change status to Dev Edit
As you start writing, don’t forget to take a look at our author handbook. It has some important info you may find useful as you work on your first draft. This document (also embedded below) is meant to help you write an article that presents your argument in a compelling way that connects with readers.
View the author guide as a Google doc or scroll the embedded document.
Make sure to include your author info, including your bio and headshot, if this is the first time you’re writing for us.
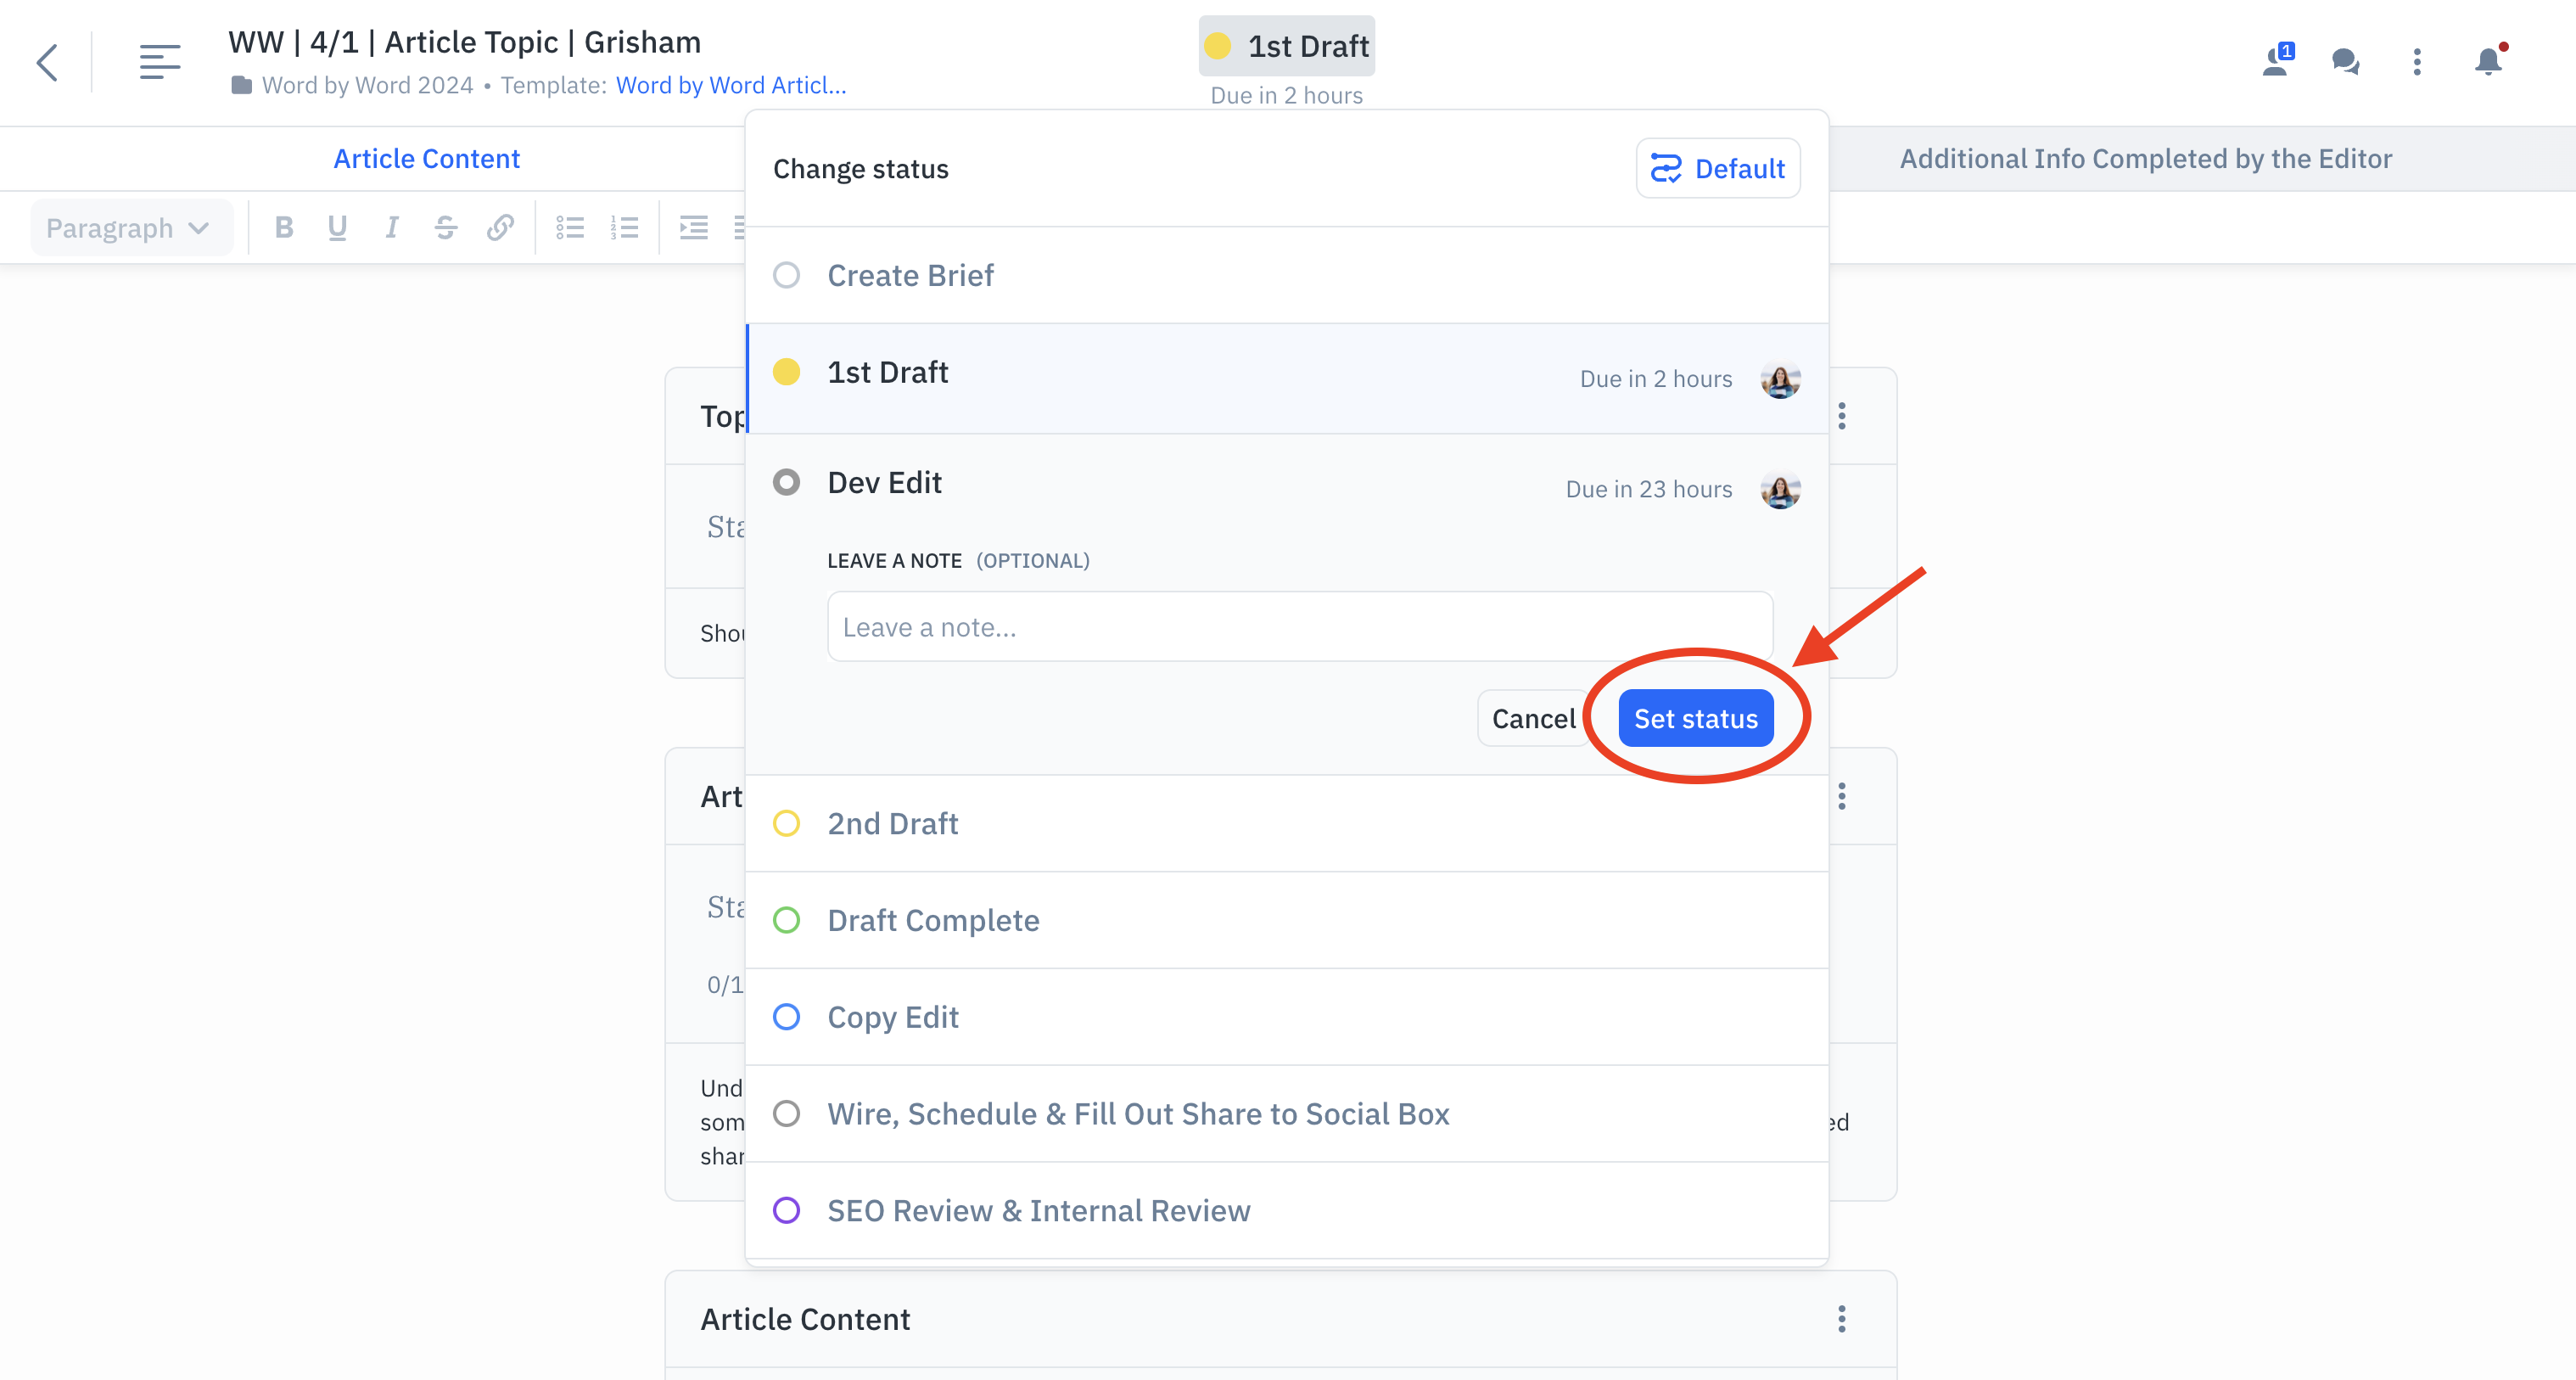
And now, you’ve written an incredible article—we’re excited to read it! Let us know your first draft is done by clicking 1st Draft at the top, then select Dev Edit from the list and click Set status. That will automatically send your article to the person who will be editing your piece. You can leave a note as you advance the workflow if you’d like, but you don’t have to.

Step 5: Complete your second draft and change status to Draft Complete
Once your editor has finished their first round of edits on your article, they’ll reassign it to you in Content Workflow should they need anything additional from you.
Once you’ve completed that second draft, you’ll do the same thing as in step 4 when you completed your first draft—just select Draft Complete and then click Set status. Here, too, you can leave a comment if you’d like.
Step 6: Once the article is published, send us the invoice for your completed article
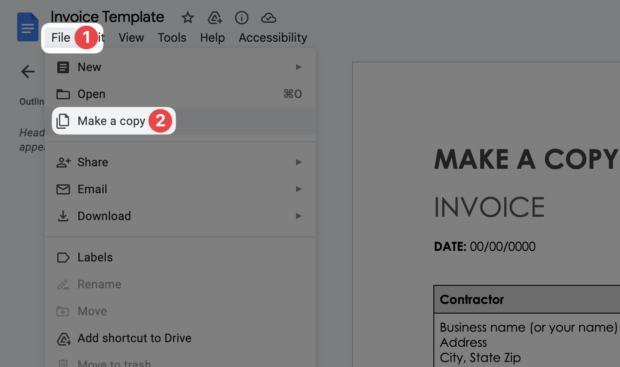
Yay! Your article is (or is about to be) published. Your editor will send you the link, which you can share on your social profiles or anywhere else you’d like. Your editor will also ask for an invoice based on your contract and final word count. If you already have a template or method to send invoices, great! If not, you can use this Google doc as a template for your invoice. Make a copy, add in your information and total amount, and your editor will send it in for payment.

FAQs
Why can’t I see my article in Content Workflow anymore?
This and the question below are the two quirkiest parts of using Content Workflow. You can only view your article when it’s in a status you’re assigned to, like First or Second Draft. If you need access again, ask your editor: he or she can do a little safecracking to get you back into the draft of your article.
Why am I getting emails about due dates or comments from Content Workflow?
Remember how we said above that Content Workflow isn’t perfect? This is the most confusing one.
For due dates:
You should only get notifications about due dates for your article when it’s currently assigned to you. Sometimes this works as intended, but not always. (We’re working with the Content Workflow team to get this to work correctly.)
When you get an email from Content Workflow saying that your article is overdue, the best idea is to open Content Workflow to make sure it’s not assigned to you. If it’s not (you’ll know because your Content Workflow dashboard will be empty), you can either ignore or ask your editor to make sure the dates are updated.
For comments:
If you are tagged in a comment, you’ll be notified by email, whether or not you currently have access to your article. We are trying to break our habit of tagging authors in articles until we’re about to give it back to them—so you will only be able to see comments when you’re able to respond.
When you are tagged in a comment that you can’t respond to, feel free to ask your editor to take a look. He or she can either give you access to your article or let you know it will be reassigned to you soon.
How do I use footnotes in Content Workflow?
Well, we love you for asking this question. If you write your first draft in Word or Google Docs, you can copy and paste your content into Content Workflow, and your footnotes should come over with it. They won’t be pretty, but they’ll be there.
We follow the Chicago Manual of Style and the SBL Handbook of Style. You can find instructions on footnotes in Chicago here.
We format footnotes with a shortcode: [ note ] to begin a footnote and [ / note ] to close a footnote—only without any spaces inside the brackets. If you are confused or don’t know how to do this, we can fix it for you. If you prefer to format your own footnotes, they should look like this:

Have a question that’s not answered here? Ask your editor or email us at contentmarketingteam@logos.com. We’ll do our best to help you find answers!

